There are a few different methods that can be used to send messages in the Web Portal depending on your needs. Let's take a look...
Quick Message
Just like sending a message from your own handset, Quick Message is an easy way to send ad hoc messages fast!
You will find a Quick Message link in the left-hand menu so it's always one click away:
Follow these basic steps to send a message:
- Enter a number, contact or group name as your recipient(s).
- If you want to use a pre-saved template, select it from the menu.
- Write your message.
- If you have automatic opt-outs set up, you can add your opt-out message by clicking the button.
- Send your message
Simple!
Helpful Tips:
- You can send to multiple contacts and/or groups with QuickMessage
- You can add a simple opt-out message by clicking the “Add unsubscribe” button
- Check the bottom of the message box to see how many characters and messages are being utilised for your send
Sending a New Message
Use this option if you want to send more complex, personalised, bulk messages.
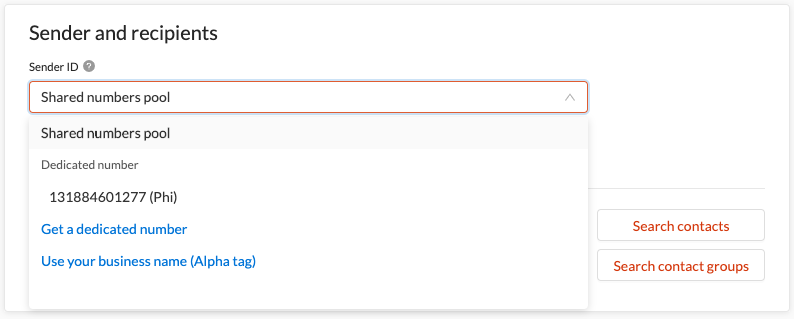
First, choose your sender ID:
- Shared numbers pool - your message will be sent from a number selected at random from a common pool. Recipients can reply to this number, but subsequent messages sent to them will appear to be from different numbers
- Use an approved, registered Alpha Tag (business name) - if you have activated this feature on your account, you can enter a business or organisation name to appear as the sender ID on the recipient's phone (otherwise known as an Alpha Tag). Recipients cannot reply to messages sent from a registered Alpha Tag.
- Dedicated Numbers - if you have purchased any dedicated numbers, they will also appear in the dropdown list for this section
Next, enter the recipient number(s), contact name(s) or group name(s) in the recipient field:
Now, compose your message in the "Message Content" field. You will see that as you type, the message preview on the right will update in real-time:
When you are happy with your message, click "Send"
Helpful Tips:
- You can send to multiple contacts and/or groups
- You can add a simple opt-out message by clicking the unsubscribe icon on the top right of the message content box
- If you are using personalisation, the preview will show you the content in line with the fields you are using (e.g. if you are sending to a saved contact who's first name is John and you type "Hi #Firstname# ..." the preview will show "Hi John")
Sending Bulk Messaging
1. To send the same message content to a large list of numbers, click on Messaging, then select New message.
2. Now, there are a few different ways you can add multiple numbers:
- Paste Numbers - if you have a list of numbers in a spreadsheet, you can copy them directly from the spreadsheet and paste them into the Recipients field:
- Add Contacts / Contact Lists / Contact Segments - depending on your needs, you can select any of these options from the buttons next to the Recipients field. Then all you have to do is tick the box next to each contact, list, or segment you want to message and click the Add Recipients button. You can also search for specific contacts using the search box:
Another way to send a bulk message to a specific List or Segment is from the Contacts page in the Hub. To do this, click onNote - this action allows you to select multiple of any desired combination of individual recipients, contact lists, and contact segments. Contacts and either Lists or Segments, then locate the list/segment you want to message and click on Send message in the corresponding ellipsis (three dots) menu:
Note - this action allows you send a bulk message to a single list or segment. - Import from file - this option is handy if you have a list of recipients that you want to message, but don't necessarily want to upload them to the Hub as actual contacts. To do this, click on Import from file above the Recipients field, then just drag & drop your contact list into the upload box, or click browse to search for your file:
The system will try to automatically detect the mobile number column from your imported data:Note - you'll need to ensure each contact number has the leading Zero at the start, you can do this by formatting the CSV column as Text.
3. Like before, now you can write your message in the Message content field. You'll notice that the personalised fields are now mirroring the column headers in your imported data file:
| Note - To see how the message will display on a recipient handset, you can click Send test. This allows you to send the composed message to yourself and/or a colleague without losing any of your data so you can continue with the send after vetting the message. |
4. Once you're happy, simply click Send now.
Important things to remember
If your messages are not sending correctly, check these important things to see if there are any errors with your broadcast:
- It's good practise to always enter numbers in international format
- If you are sending to numbers in the local country (e.g. sending to Australian numbers only, from Australia) then you do not need to add the international prefix
- If you do add the international code, the send should still work; however, as mentioned above, you will need to ensure it is added correctly
- If you are copying and pasting numbers into the recipient field, the web portal will automatically add the international prefix of whatever country you have set as your location, if this prefix is not already present in the number